How Opal is mined
When the first opal mine shafts in Australia were being dug, they didn’t have the diesel equipment used to drive mine shafts and test opal dirt like they do now. In the early days of opal mining, shaft sinking with a pick, shovel and nothing but a candle for light was the way of the Opal Trade in Australia.

A shaft is sunk straight down until some promising “opal dirt” is discovered, whilst test holes are now dug first prior to committing to an Opal claim. An Opal claim can be purchased by anyone and provides the rights to dig on an allotted segment of land for a specified period of time. Once promising opal dirt is found, the miner would tunnel the shaft down to the opal level and then branch out sideways, following the “level” of opal. Driving along the opal level is carried out by a number of different methods.
Depending on the location of the mine, the hardness of the ground requires different approaches. A common practice in South Australian open cut mines is the use of explosives! On softer ground, picks, diggers, jack hammers and most economically with picks.
For seam opal, miners follow veins of potch found in the walls of the mine in the hopes that the veins will turn to colour. The Opal is then collected and doesn’t require processing at a wash plant. Other forms of Opal from South Australia and NSW is mined, then collected via a bogger and then washed at a wash plant which is a giant ‘rock tumbler’ utilising a cement mixing barrel to separate the host rock from any opal that there may be. Miners then look through the material in the hopes of finding an colour material.
Both shaft and open-cut mining takes place at Lightning Ridge, although shaft-mining is more common due to the way opals on this famous field were formed. “Ridge” opal is encased in rounded formations known as “nobbies”… but not all nobbies contain opal.
In Queensland, the majority of mines worked in recent years are large open-cut operations. Boulder material is removed from the ground using equipment like an excavator, boulders that don’t present colour immediately are then broken with a gem pick to see if any colour runs through the boulder, this practise is more common for Yowah nut material. At select locations like Yowah, underground methods are still applied with success.
How we source Opal
At The Good Opal co. we are committed to sourcing all opal ethically and that is why we source all opal directly from Australian Miners. A majority of the material we source is from Lightning Ridge and Coober Pedy with a limited number of Mintabie, white cliffs and Boulder Opal pieces. We’re committee to this mission for several reasons; we believe Australian Gemstones should create business for Australian miners. We are committed to quality and above all else creating as little negative affect on the environment as possible.
How to tell if an Opal will cut
There are a few tricks to know if an opal will or won’t cut. However, an opal will rarely cut to your expectations.
Rough Opals from South Australia and NSW are layered, there’s potch, the colour bar and often sandstone and other minerals.
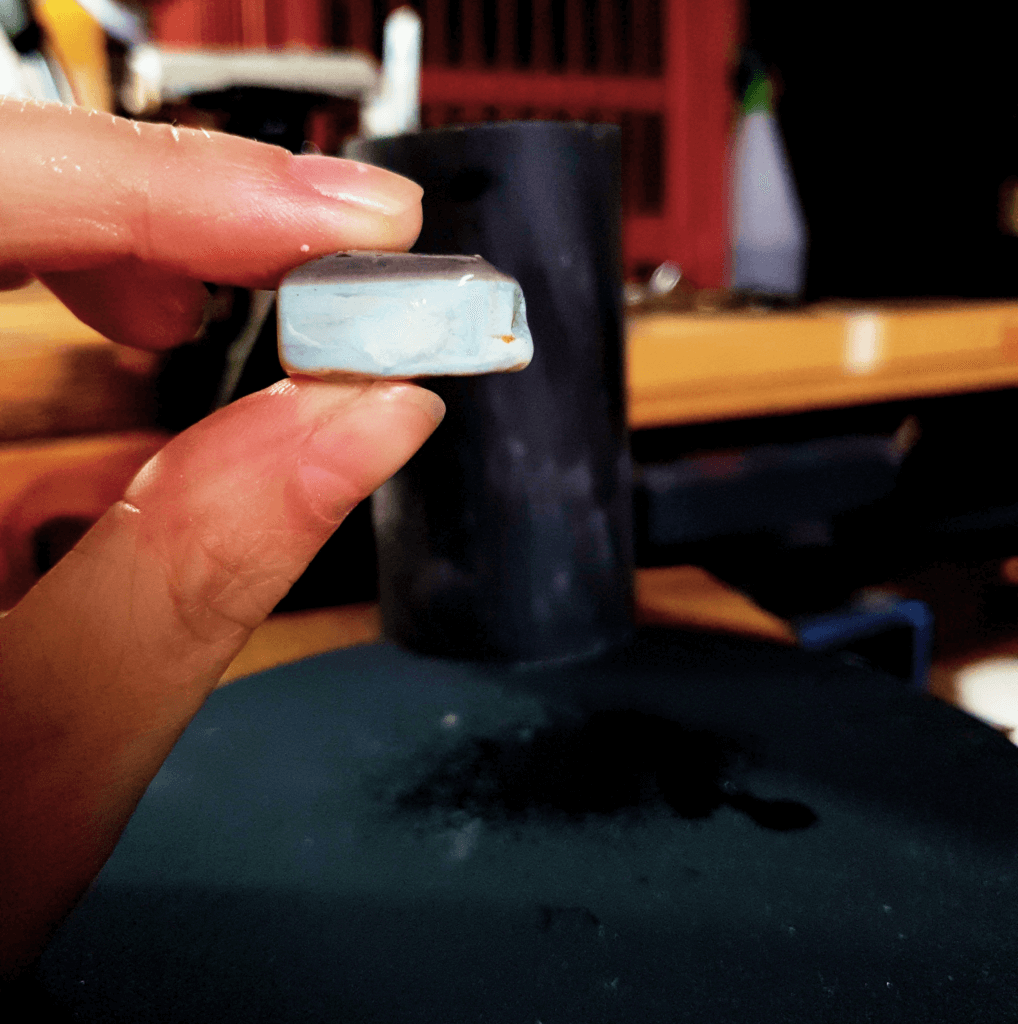
By wetting the rough opal material and shining it under light, you can usually see if there’s any colour running through. The main indicators that will let you know if the opal will cut or not are as follows:
- If the Opal is clean with you shine a torch to it. This can’t be done on black opal as the light can’t pass through but it does work on all other opal material. If the light reveals sand, potch patches, cracks or other inclusions these could present potential problems for cutting an opal.
- If the colour bar runs all the way around the opal. If the colour only runs a portion of the way through the stone it may only cut a very small opal or potentially wont face at all depending on the positioning of the colour bar.
- The thickness of the colour bar. If the colour bar is thick, this is the most promising sign that the opal will cut a nice stone.
You’ll learn when you’re opal cutting not all opals are perfect, colour bars are sometimes messy, hard to find or very thin or uneven, they have pesky sand inclusions, natural cracks, potch webbing and imperfections taking away from the beautiful colour of the opal. So, below we’ve listed some important tips you should always think about before cutting an opal.
Opal Cutting Tips
- Get a small torch and hold the opal to the light. This should help you to identify the colour bar and any imperfections in the stone as shown below.
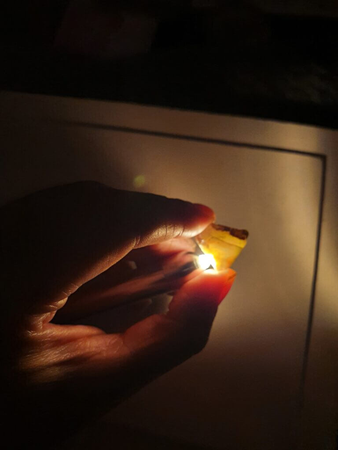
As seen in the image, whilst the piece is relatively clean and does not have and sand in the piece of potch interrupting the colour bar there is a line appearing in the opal which is most likely a crack. The crack doesn’t appear on the other side of the opal which tells me it may not go all the way through which is good because it means we can potentially save more carats.
I highly recommend to you what a miner named Rob with 50 years of mining and opal cutting experience from lightning Ridge said to me. Start with Potch. It can be boring spending the time to hone your skills without the reward of colour, but it is well worth it.
- When you start to cut an opal, always rub the edges first to get the best view of the colour bar. This will help you decide on shape and the positioning of the backing.
- Less is more when it comes to opal rubbing. That’s why you should only to an approximate backing so that once the opal is face, if you need to adjust it, you have enough material to do so.
Once you have an approximate shape-if you can, begin with an oval shape as this is an easier starting point and it is very difficult to get a perfect circle without the use of a cutting wheel-You will need to determine which side of the opal will be your base.
The base of the opal is usually the side with the thickest potch or least problematic potch. So, then all the uneven potch can be sanding away to reveal the colour top.
If your opal has sandstone on one side and potch on the other, the potch side will automatically become you base as it provides body tone to the opal and sandstone is the parent material, we want to get rid of.
To create a good base on your opal you need to leave enough thickness on the base whilst also getting rid of any rough uneven material. This comes down to personal preference as well as the way you want to shape your opal i.e. High dome, low dome, flat etc but as a general guide I would advise not to get rid or more than you have to that allows for a flat smooth surface.
Once the base is smooth you need to create a setting edge, which means rounding out all of the sharp edges on the base of your opal so that the back of your opal curves to the top of your opal.
Once your base is done you can focus your attention to the colour top. The most important opal cutting tip is to not rub the face of the opal flat. Why? Because this creates a flat top which can be difficult to sand out.
If you any other burning questions reach out to us on socials or via the contact page at: https://www.goodopalco.com/contact/